Swift Learning (7) - Control Flow (Improved Code Version)

Swift provides a variety of control flow structures, including while loops for executing tasks multiple times, if, guard, and switch statements for selecting different code branches based on specific conditions, as well as break and continue statements for jumping to other locations in the code.
Swift also offers the for-in loop, which makes it easier to iterate over arrays, dictionaries, ranges, strings, and other sequence types.
The switch statement in Swift is more powerful than in many C-like languages. case can match many different patterns, including range matching, tuples, and specific type matching. The values matched in a switch statement’s case can be declared as temporary constants or variables for use within the scope of the case, and can also be combined with where to describe more complex matching conditions.
For-In Loops
You can use a for-in loop to iterate over all elements in a collection, such as elements in an array, numbers in a range, or characters in a string.
The following example uses for-in to iterate over all elements in an array:
let names = ["Anna", "Alex", "Brian", "Jack"]
for name in names {
        print("Hello, \(name)!")
}  // Hello, Anna!  // Hello, Alex!  // Hello, Brian!  // Hello, Jack!
---
output: Hello, Anna!
Hello, Alex!
Hello, Brian!
Hello, Jack!
You can also iterate over a dictionary to access its key-value pairs. When iterating over a dictionary, each element is returned as a (Key, Value) tuple, which can be explicitly named in the for-in loop. In the example below, the dictionary’s key is declared as the constant animalName, and the value as the constant legCount:
let numberOfLegs = ["Spider": 8, "Ant": 6 , "Cat": 4]
for (animalName, legCount) in numberOfLegs {
        print("\(animalName) has \(legCount) legs!")
}  // Cat has 4 legs!  // Ant has 6 legs!  // Spider has 8 legs!
---
output: Ant has 6 legs!
Cat has 4 legs!
Spider has 8 legs!
The contents of a dictionary are theoretically unordered, and the order of elements when iterating is not guaranteed. The order in which elements are inserted into the dictionary does not determine the order in which they are iterated.
for-in loops can also use numeric ranges. The following example outputs part of a multiplication table.
for index in 1...5 {  // By default, index in the loop is a constant and cannot be changed within the loop. If you want a variable, you can use for var index in 1...5 {}
        print("\(index) times 5 is \(index * 5)")
}  // 1 times 5 is 5  // 2 times 5 is 10  // 3 times 5 is 15  // 4 times 5 is 20  // 5 times 5 is 25
---
output: 1 times 5 is 5
2 times 5 is 10
3 times 5 is 15
4 times 5 is 20
5 times 5 is 25
In the example above, the elements to be iterated are represented by the closed range operator ..., indicating the range of numbers from 1 to 5. index is assigned the first number in the closed range (1), and then the statements in the loop are executed once. In this case, the loop contains only one statement, which outputs the result of multiplying the current index by 5. After the statement is executed, the value of index is updated to the second number in the closed range (2), and the print(_:separator:terminator:) function is executed again. This process continues until the end of the closed range.
In the example above, index is a constant that is automatically assigned at the start of each loop iteration. In this case, index does not need to be declared before use; simply include it in the loop declaration for implicit declaration, without needing the let keyword.
If you do not need the value of each item in the range sequence, you can use an underscore _ instead of a variable name to ignore the value:
let base = 3
let power = 10
var answer = 1
for _ in 1...power {
        answer *= base
}
print("\(base) to the power of \(power) is \(answer).")  // Outputs "3 to the power of 10 is 59049."
---
output: 3 to the power of 10 is 59049.
This example calculates the powerth power of base (in this case, 3 to the 10th power), starting from 1 (3 to the 0th power), multiplying by 3 ten times, using a closed range loop from 1 to 10. The calculation does not need to know the value of the counter in each iteration, only that the correct number of iterations is performed. The underscore _ (replacing the variable in the loop) ignores the current value and does not provide access to the value during iteration.
In some cases, you may not want to use a closed range that includes both endpoints. Imagine drawing minute tick marks on a watch face. There are 60 tick marks in total, starting from 0. You can use the half-open range operator ..< to represent a range that includes the lower bound but excludes the upper bound.
let minutes = 60
for tickMark in 0..<minutes {
        // Render a tick mark for each minute
}
Some users may want fewer tick marks in their UI, such as one every 5 minutes, using the stride(from:to:by:) function to skip unnecessary marks.
let minuteInterval = 5
for tickMark in stride(from: 0, to: minutes, by: minuteInterval) {
        // Render a tick mark every 5 minutes (0, 5, 10, 15...50, 55)
}
You can achieve the same effect with a closed range using stride(from:through:by:):
let hours = 12
let hourInterval = 3
for tickMark in stride(from: 3, through: hours, by: hourInterval) {
        // Render a tick mark every 3 hours (3, 6, 9, 12)
}
The above examples use for-in loops to iterate over ranges, arrays, dictionaries, and strings. You can use them to iterate over any collection, including custom classes or collection types that implement the Sequence protocol.
Using for-in to iterate over a Set collection:
let fruitSet: Set<String> = ["Apple", "Orange", "Peach"]
for fruit in fruitSet.sorted() {
        print("I love \(fruit).")
}
---
output: I love Apple.
I love Orange.
I love Peach.
While Loops
A while loop runs a block of statements repeatedly until a condition becomes false. This type of loop is suitable when the number of iterations is unknown before the first iteration. Swift provides two forms of while loops:
- The
whileloop, which evaluates the condition at the start of each iteration; - The
repeat-whileloop, which evaluates the condition at the end of each iteration;
while
A while loop starts by evaluating a condition. If the condition is true, it repeats a block of statements until the condition becomes false.
Here is the general format of a while loop:
/*
while condition {
        statements
}
*/
The following example plays a game called Snakes and Ladders:
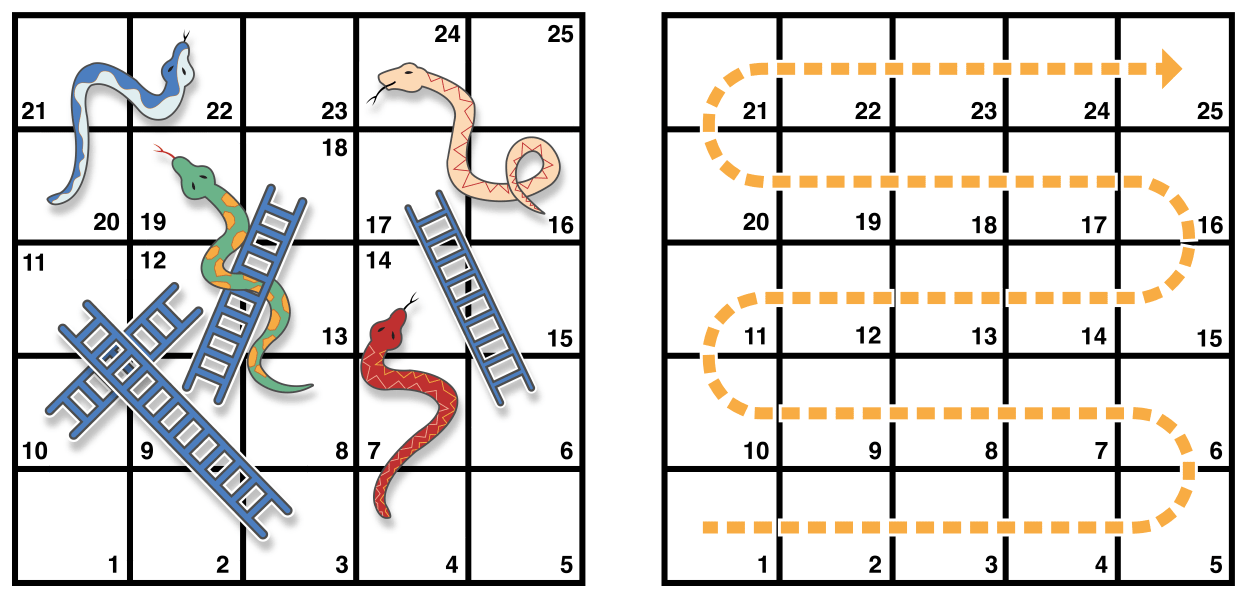
Game Rules:
- The game board has 25 squares, and the goal is to reach or exceed square 25;
- Each round, you roll a six-sided die to determine how many squares to move, following the path shown by the dashed lines above;
- If you land at the bottom of a ladder, you can climb up;
- If you land on the head of a snake, you slide down.
The game board can be represented by an Int array, with its length stored in a constant finalSquare, used to initialize the array and check for victory. The board is initialized with 26 zeros (from 0 to 25, inclusive):
let finalSquare = 25
var board = [Int](repeating: 0, count: finalSquare + 1)
// Some squares are set to specific values to indicate ladders or snakes. The bottom of a ladder is a positive value to move up, the head of a snake is a negative value to move down:
board[03] = +08; board[06] = +11; board[09] = +09; board[10] = +02
board[14] = -10; board[19] = -11; board[22] = -02; board[24] = -08
Square 3 is the bottom of a ladder, moving up to square 11, represented by board[03] = +08 (the difference between 11 and 3). For alignment, a unary plus or minus is used, and numbers less than 10 are padded with a leading zero. These syntax tricks are not necessary, just for code neatness.
The player starts at square 0, off the board, and enters the board after the first dice roll:
var square = 0
var diceRoll = 0
while square < finalSquare {
        // Roll the die
        diceRoll += 1
        if diceRoll == 7 { diceRoll = 1 }
        // Move according to the roll
        square += diceRoll
        if square < board.count {
                // Climb the ladder or slide down the snake
                square += board[square]
        }
        print(square, terminator: " ")
}
print("Game Over!")
---
output: 1 11 4 8 13 8 18 20 23 27 Game Over!
This example uses a simple way to simulate rolling a die. diceRoll is not a random number, but starts at 0 and increases by 1 each while loop, resetting to 1 when it reaches 7. So diceRoll cycles through 1, 2, 3, 4, 5, 6, 1, 2, etc.
After rolling, the player moves forward by diceRoll squares. If the player moves past square 25, the game ends. To handle this, the code checks if square is less than board.count before adding board[square] to move up or down.
Note
Without this check (
square < board.count), accessingboard[square]could go out of bounds and cause a runtime error.After each
whileloop iteration, the loop condition is checked again. If the player reaches or exceeds square 25, the loop ends and the game is over. Thewhileloop is suitable here because we don’t know how long the game will last; the loop ends only when a specific condition is met.
Repeat-While
The other form of while loop is repeat-while, which differs in that it executes the code block once before checking the loop condition, then repeats until the condition is false.
Note
The
repeat-whileloop in Swift is similar to thedo-whileloop in other languages.
Here is the general format of a repeat-while loop:
/*
 repeat {
         statements
 } while condition
*/
Let’s play Snakes and Ladders again, this time using a repeat-while loop. The values of finalSquare, board, square, and diceRoll are initialized the same as before:
let FinalSquare = 25
var boards = [Int](repeating: 0, count: FinalSquare + 1)
boards[03] = +08; boards[06] = +11; boards[09] = +09; boards[10] = +02
boards[14] = -10; boards[19] = -11; boards[22] = -02; boards[24] = -08
var Square = 0
var DiceRoll = 0
In the repeat-while version, the first step in the loop is to check if the player is on a ladder or snake. No ladder will take the player directly to square 25, so it’s safe to check for ladders or snakes at the start of the loop.
At the start, the player is at square 0, and board[0] is always 0, so it has no effect:
repeat {
        // Climb the ladder or slide down the snake
        Square += boards[Square]
        // Roll the die
        DiceRoll += 1
        if DiceRoll == 7 { DiceRoll = 1 }
        // Move according to the roll
        Square += DiceRoll
        print(Square, terminator: " ")
} while Square < FinalSquare
print("Game Over!")
---
output: 1 3 14 8 13 19 9 20 23 27 Game Over!
After checking for ladders or snakes, the player rolls the die and moves forward by diceRoll squares, ending the current iteration.
The loop condition (while Square < FinalSquare) is the same as before, but is only checked after the loop body. In this game, repeat-while works better than while. The repeat-while version runs Square += boards[Square] immediately if Square hasn’t exceeded the limit, saving the need for an array bounds check.
Conditional Statements
Executing code based on specific conditions is often useful. For example, you may want to run extra code when an error occurs, or display a message when a value is too high or too low. To achieve this, you need conditional statements.
Swift provides two types of conditional statements: if statements and switch statements. Typically, use if statements for simple conditions with few possible cases. Use switch statements for more complex conditions with many combinations, or when pattern matching is needed.
If
The simplest form of an if statement contains only one condition; the code is executed only if the condition is true:
var temperatureInFahrenheit = 30
if temperatureInFahrenheit <= 32 {
        print("It's very cold! Consider wearing a scarf.")
}  // Outputs "It's very cold! Consider wearing a scarf."
---
output: It's very cold! Consider wearing a scarf.
The example checks if the temperature is less than or equal to 32°F (the freezing point of water). If so, it prints a message; otherwise, it does nothing and continues after the if block.
Of course, if statements allow for two-way branching using an else clause, which executes when the condition is false:
temperatureInFahrenheit = 40
if temperatureInFahrenheit <= 32 {
        print("It's very cold! Consider wearing a scarf.")
} else {
        print("It's not that cold. Wear a t-shirt.")
}  // Outputs "It's not that cold. Wear a t-shirt."
---
output: It's not that cold. Wear a t-shirt.
Clearly, one of the two branches will always be executed. Since the temperature is now 40°F, it’s not that cold, so the else branch is triggered.
You can chain multiple if statements together for more branches:
temperatureInFahrenheit = 90
if temperatureInFahrenheit <= 32 {
        print("It's very cold. Consider wearing a scarf.")
} else if temperatureInFahrenheit >= 86 {
        print("It's really warm. Don't forget to wear sunscreen.")
} else {
        print("It's not that cold. Wear a t-shirt.")
}  // Outputs "It's really warm. Don't forget to wear sunscreen."
---
output: It's really warm. Don't forget to wear sunscreen.
In the example above, an extra if checks if it’s especially hot. The final else is kept for when it’s neither cold nor hot.
In fact, the final else is optional if you don’t need to handle all cases:
temperatureInFahrenheit = 72
if temperatureInFahrenheit <= 32 {
        print("It's very cold. Consider wearing a scarf.")
} else if temperatureInFahrenheit >= 86 {
        print("It's really warm. Don't forget to wear sunscreen.")
}
Here, since it’s neither cold nor hot, neither the if nor the else if branch is triggered, so nothing is printed.
Switch
A switch statement tries to match a value against several patterns. Based on the first successful match, the corresponding code is executed. When there are many possible cases, a switch statement is usually used instead of if.
The simplest form of a switch statement compares a value against one or more values of the same type:
/*
 switch some value to consider {
 case value 1:
         respond to value 1
 case value 2, value 3:
         respond to value 2 or 3
         default:
         otherwise, do something else
 }
 */
A switch statement consists of multiple case clauses, each starting with the case keyword. To match more specific values, Swift provides several ways to perform more complex pattern matching, which will be discussed later.
Like if statements, each case is a branch of code execution. The switch statement determines which branch to execute, a process called switching based on the given value.
A switch statement must be exhaustive. This means every possible value must be covered by at least one case. If not all values can be covered, a default branch must be used to cover all remaining values, and it must be the last branch.
The following example uses a switch statement to match a lowercase character named someCharacter:
let someCharacter: Character = "z"
switch someCharacter {
case "a":
        print("The 1st letter of the alphabet.")
case "z":
        print("The last letter of the alphabet.")
default:
        print("Some other character.")
}  // Outputs "The last letter of the alphabet."
---
output: The last letter of the alphabet.
In this example, the first case matches the first letter a, the second matches the last letter z. Because a switch must cover all possible characters, not just letters, the default branch matches all other values, ensuring the switch is exhaustive.
No Implicit Fallthrough
Unlike switch statements in C and Objective-C, in Swift, after the code in a matched case branch is executed, the switch statement ends and does not continue to the next case. That is, you do not need to use break explicitly in each case, making switch safer and easier to use, and avoiding errors from missing break statements.
Note
Although
breakis not required in Swift, you can still use it to exit acasebranch early.
Each case must contain at least one statement. The following code is invalid because the first case is empty:
let anotherCharacter: Character = "a"
switch anotherCharacter {
//case "a": // Invalid, this branch has no statements. Uncommenting will cause a compile error: 'case' label in a 'switch' should have at least one executable statement
case "A":
        print("The letter A.")
default:
        print("Not the letter A.")
}
---
output: Not the letter A.
Unlike in C, Swift’s switch does not match both “A” and “a” together. This avoids accidentally falling through from one case to another, making the code safer and more intuitive.
To match both “a” and “A” in a single case, combine the values with a comma:
let AnotherCharacter: Character = "a"
switch AnotherCharacter {
case "A", "a":
        print("The letter A.")
default:
        print("Not the letter A.")  // Outputs "The letter A."
}
---
output: The letter A.
For readability, compound matches can be written on multiple lines.
Note
If you want to explicitly fall through to the next case, use the
fallthroughstatement.
Range Matching
A case pattern can also be a range of values. The following example shows how to use range matching to output a natural language description for any number:
let approximateCount = 62
let countedThings = "Moons orbiting Saturn"
let naturalCount: String
switch approximateCount {
case 0:
        naturalCount = "no"
case 1..<5:
        naturalCount = "a few"
case 5..<12:
        naturalCount = "several"
case 12..<100:
        naturalCount = "dozens of"
case 100..<1000:
        naturalCount = "hundreds of"
default:
        naturalCount = "many"
}
print("There are \(naturalCount) \(countedThings).")  // Outputs "There are dozens of Moons orbiting Saturn."
---
output: There are dozens of Moons orbiting Saturn.
In this example, approximateCount is evaluated in a switch statement. Each case is compared in turn. Since approximateCount falls in the 12 to 100 range, naturalCount is set to “dozens of”, and the switch exits.
Tuples
You can use tuples to test multiple values in the same switch statement. Tuple elements can be values or ranges. Use an underscore _ to match any value.
The following example shows how to use a tuple of type (Int, Int) to classify a point (x, y) in the diagram below:
let somePoint = (1, 1)
switch somePoint {
case (0, 0):
        print("\(somePoint) is at the origin.")
case (_, 0):
        print("\(somePoint) is at the x-axis.")
case (0, _):
        print("\(somePoint) is at the y-axis.")
case (-2...2, -2...2):
        print("\(somePoint) is inside the box.")
default:
        print("\(somePoint) is outside of the box.")
}  // Outputs "(1, 1) is inside the box."
---
output: (1, 1) is inside the box.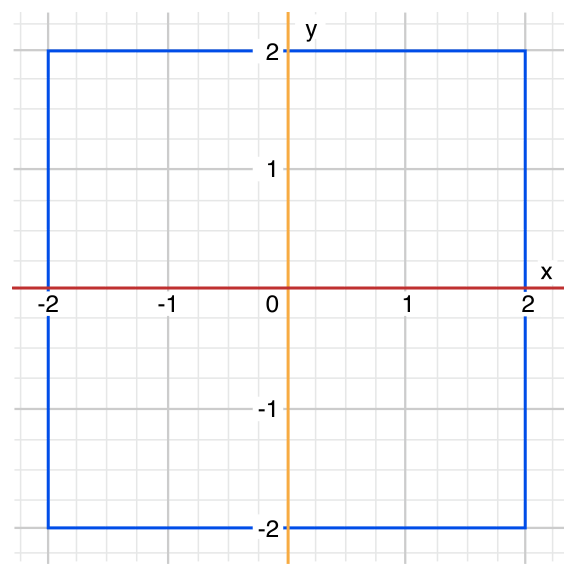
In the example above, the switch checks if a point is at the origin (0, 0), on the red x-axis, on the orange y-axis, inside a 4x4 blue rectangle centered at the origin, or outside the rectangle.
Unlike C, Swift allows multiple case branches to match the same value. In this example, the point (0, 0) could match all four cases, but only the first matching case is executed. For (0, 0), it matches case (0, 0) first, so the rest are ignored.
Value Bindings
case branches allow you to declare matched values as temporary constants or variables for use within the branch. This is called value binding, because the matched value is bound to a temporary constant or variable within the branch.
The following example classifies a point (x, y), represented as a tuple (Int, Int):
let anotherPoint = (2, 1)
switch anotherPoint {
case (let x, 0):
        print("On the x-axis with an x value of \(x).")
case (0, let y):
        print("On the y-axis with a y value of \(y).")
case let (x, y):
        print("Somewhere else at (\(x), \(y)).")
}  // Somewhere else at (2, 1).
---
output: Somewhere else at (2, 1).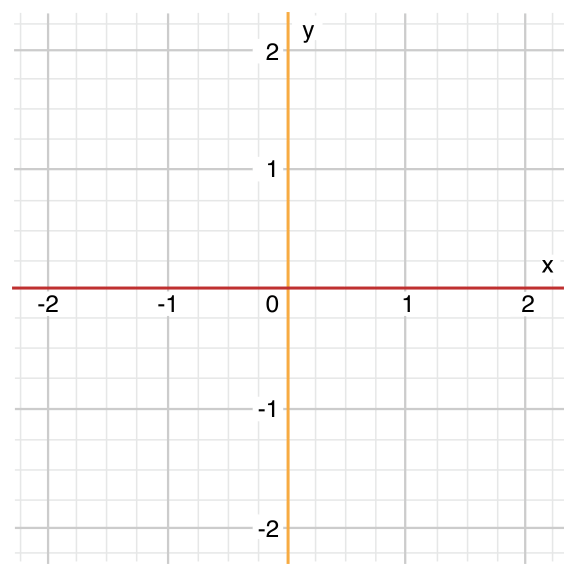
In the example above, the switch checks if a point is on the red x-axis, on the orange y-axis, or not on either axis.
All three cases declare placeholder constants x and y to temporarily get one or both values from the tuple anotherPoint. The first case, case(let x, 0), matches a point with y-coordinate 0 and assigns the x-coordinate to x. Similarly, the second case, case(0, let y), matches a point with x-coordinate 0 and assigns the y-coordinate to y.
Once declared, these temporary constants can be used within their respective case branches, as in this example for printing the point’s type.
Note that this switch does not have a default branch, because the last case, case let (x, y), matches all remaining values, making the switch exhaustive.
where
A case pattern can use a where clause to check additional conditions.
The following example classifies a point (x, y) as shown below:
let yetAnotherPoint = (1, -1)
switch yetAnotherPoint {
case let (x, y) where x == y:
        print("(\(x), \(y)) is on the line x == y.")
case let (x, y) where x == -y:
        print("(\(x), \(y)) is on the line x == -y." )
case let (x, y):
        print("(\(x), \(y)) is just some arbitrary point.")
}  // Outputs "(1, -1) is on the line x == -y."
---
output: (1, -1) is on the line x == -y.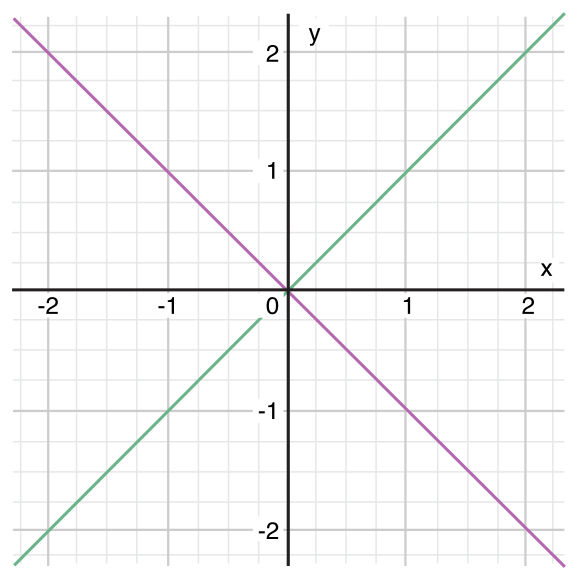
In the example above, the switch checks if a point is on the green diagonal x == y, on the purple diagonal x == -y, or not on either diagonal.
All three cases declare placeholder constants x and y to temporarily get both values from the tuple yetAnotherPoint. These constants are used as part of the where clause, creating a dynamic filter. The case branch is executed only if the where condition is true.
As in the value binding example, since the last case matches all remaining values, the switch is exhaustive and does not need a default branch.
Compound Cases
When multiple conditions can be handled the same way, you can put them in the same case, separated by commas. If any pattern matches, the branch is executed. If the list is long, you can write it on multiple lines.
let SomeCharacter: Character = "e"
switch SomeCharacter {
case "a", "e", "i", "o", "u":
        print("\(SomeCharacter) is a vowel.")
case "b", "c", "d", "f", "g", "h", "j", "k", "l", "m", "n",
         "p", "q", "r", "s", "t", "v", "w", "x", "y", "z":
        print("\(SomeCharacter) is a consonant.")
default:
        print("\(SomeCharacter) is not a vowel or a consonant.")
}  // Prints "e is a vowel."
---
output: e is a vowel.
The first case matches the five lowercase vowels in English. Similarly, the second matches all lowercase consonants. The default branch matches all other characters.
Compound matches can also include value bindings. All patterns in a compound match must include the same value bindings, and each binding must get the same type of value. This ensures that, no matter which pattern matches, the code in the branch can access the bound value with the same type.
let stillAnotherPoint = (9, 0)
switch stillAnotherPoint {
case (let distance, 0), (0, let distance):
        print("On the axis, \(distance) from the origin.")
default:
        print("Not on an axis.")
}  // Outputs "On the axis, 9 from the origin."
---
output: On the axis, 9 from the origin.
The above case has two patterns: (let distance, 0) matches values on the x-axis, (0, let distance) matches values on the y-axis. Both bind distance as an integer, so the code in the branch can access distance regardless of which pattern matched.
Control Transfer Statements
Control transfer statements change the order in which code is executed, allowing you to jump to different parts of your code. Swift has five control transfer statements:
- continue
- break
- fallthrough
- return
- throw
Below, continue, break, and fallthrough are introduced. return will be discussed in the functions chapter, and throw in the error handling chapter.
Continue
The continue statement tells a loop to stop the current iteration and start the next one immediately. It’s like saying “I’m done with this iteration,” but without leaving the loop.
The following example removes vowels and space characters from a lowercase string, generating a cryptic short phrase:
let puzzleInput = "Great minds think alike"
var puzzleOutput = ""
for character in puzzleInput {
        switch character {
        case "a", "e", "i", "o", "u", " ":
                continue
        default:
                puzzleOutput.append(character)
        }
}
print(puzzleOutput)  // Outputs "Grtmndsthnklk"
---
output: Grtmndsthnklk
In the code above, whenever a vowel or space is matched, the continue statement ends the current iteration and starts the next. This means that vowels and spaces are skipped, and only non-matching characters are appended.
Break
The break statement immediately ends the execution of the entire control flow. break can be used in switch or loop statements to exit early.
Break in Loops
When used in a loop, break immediately exits the loop and jumps to the first line after the closing brace } of the loop. No further code in the current iteration or future iterations is executed.
Break in Switch Statements
When used in a switch block, break immediately exits the switch block and jumps to the first line after the closing brace }.
This feature can be used to match or ignore one or more branches. Since Swift’s switch must cover all cases and does not allow empty branches, sometimes you need to explicitly match or ignore a branch. To ignore a branch, write a break statement in it; when matched, the break immediately ends the switch block.
Note
If a switch branch contains only comments, it will cause a compile-time error. Comments are not statements and do not allow a switch branch to be ignored. Use
breakto ignore a branch.
The following example uses switch to determine if a Character represents the number 1-4 in four different languages. For simplicity, multiple values are included in the same branch.
let numberSymbol: Character = "三"  // The number 3 in Simplified Chinese
var possibleIntegerValue: Int?
switch numberSymbol {
case "1", "١", "一", "๑":
        possibleIntegerValue = 1
case "2", "٢", "二", "๒":
        possibleIntegerValue = 2
case "3", "٣", "三", "๓":
        possibleIntegerValue = 3
case "4", "٤", "四", "๔":
        possibleIntegerValue = 4
default:
        break
}
if let integerValue = possibleIntegerValue {
        print("The integer value of \(numberSymbol) is \(integerValue).")  // Outputs "The integer value of 三 is 3."
} else {
        print("An integer value could not be found for \(numberSymbol).")
}
---
output: The integer value of 三 is 3.
This example checks if numberSymbol is 1-4 in Latin, Arabic, Chinese, or Thai. If matched, the corresponding switch branch sets the Int? variable possibleIntegerValue.
After the switch block, the code uses optional binding to check if possibleIntegerValue was set. Since it’s an optional, it has an implicit initial value of nil, so only if it was set in one of the first four branches will the binding succeed.
In the example, it’s unrealistic to enumerate all possible Character values, so the default branch covers all unmatched cases. Since nothing needs to be done in the default, only a break is written. Once in the default, break completes the branch, and code continues with the if let statement.
Fallthrough
In Swift, switch statements do not fall through from one case to the next. Instead, once the first matching case completes its statements, the entire switch block ends. In contrast, C requires explicit break statements to prevent falling through. Swift’s avoidance of default fallthrough makes switch clearer and more predictable, avoiding accidental execution of multiple cases.
If you do need C-style fallthrough, use the fallthrough keyword in the desired case. The following example uses fallthrough to create a description of a number:
let integerToDescribe = 5
var description = "The number \(integerToDescribe) is "
switch integerToDescribe {
case 2, 3, 5, 7, 11, 13, 17, 19:
        description += "a prime number, and also "
        fallthrough
default:
        description += "an integer."
}
print(description)  // Prints "The number 5 is a prime number, and also an integer."
---
output: The number 5 is a prime number, and also an integer.
This example defines a String variable description and sets an initial value. The function uses switch logic to check the value of integerToDescribe. If it matches one of the listed primes, it appends a phrase indicating it’s a prime, then uses fallthrough to continue to the default branch, which appends more text.
If integerToDescribe is not a listed prime, it matches the default branch.
After the switch, print(_:separator:terminator:) prints the description. In this example, 5 is correctly identified as a prime.
Note
The
fallthroughkeyword does not check the matching condition of the next case; it simply continues execution into the next case’s code, just like in C.
Labeled Statements
In Swift, you can nest loops and conditional statements to create complex control flow. Both loops and conditionals can use break to exit the entire block early. Therefore, it’s useful to explicitly indicate which loop or conditional a break is intended to exit. Similarly, if there are many nested loops, it’s useful to indicate which loop a continue should affect.
To do this, you can use a statement label to mark a loop or conditional. For a conditional, use break with the label to exit the marked statement. For a loop, use break or continue with the label to exit or continue the marked statement.
Declare a labeled statement by placing a label before the statement’s keyword on the same line, followed by a colon. Here is the syntax for a labeled while loop; the same rules apply to all loops and conditionals.
/*
 label name: while condition {
         statements
 }
 */
The following example is an adaptation of the Snakes and Ladders game from earlier, using a labeled while loop with break and continue. This version adds a new rule:
- To win, you must land exactly on square 25.
- If a dice roll would move you past square 25, you must roll again until you land exactly on square 25. The board is the same as before.
finalSQUARE, BOARD, SQUARE, and diceROLL are initialized as before:
let finalSQUARE = 25
var BOARD = [Int](repeating: 0, count: finalSQUARE + 1)
BOARD[03] = +08; BOARD[06] = +11; BOARD[09] = +09; BOARD[10] = +02
BOARD[14] = -10; BOARD[19] = -11; BOARD[22] = -02; BOARD[24] = -08
var SQUARE = 0
var diceROLL = 0
This version uses a while loop and switch to implement the game logic. The while loop has a label gameLoop to indicate it’s the main game loop.
The loop condition is while SQUARE != finalSQUARE, meaning you must land exactly on square 25.
gameLoop: while SQUARE != finalSQUARE {
        diceROLL += 1
        if diceROLL == 7 { diceROLL = 1 }
        switch SQUARE + diceROLL {
        case finalSQUARE:
                break gameLoop
        case let newSquare where newSquare > finalSQUARE:
                continue gameLoop
        default:
                SQUARE += diceROLL
                SQUARE += BOARD[SQUARE]
        }
        print(SQUARE, terminator: " ")
}
print("Game Over!")
---
output: 1 11 4 8 13 8 18 20 23 16 18 21 Game Over!
Each iteration starts by rolling the die. Unlike before, where the player moved immediately, here a switch considers the result of each move to decide if the player can move.
- If the roll lands the player exactly on the final square, the game ends.
break gameLoopjumps to the first line after thewhileloop, ending the game. - If the roll would move the player past the final square, the move is invalid and the player must roll again.
continue gameLoopends the current iteration and starts the next. - In all other cases, the move is valid. The player moves forward by
diceROLL, then the game logic checks for ladders or snakes. The iteration ends, and the loop condition is checked again.
Note
If the
breakdid not use thegameLooplabel, it would only exit theswitch, not thewhileloop. Using the label makes it clear which block is being exited.Also, using
continue gameLoopis not strictly necessary here, since there is only one loop, but it is allowed and makes the logic clearer, especially alongsidebreak gameLoop.
Early Exit
Like if, the execution of guard depends on a Boolean expression. You can use a guard statement to require a condition to be true in order to execute the code after the guard. Unlike if, a guard statement always has an else clause, which is executed if the condition is not true.
func greet(person: [String: String]) {
        guard let name = person["name"] else {
                return
        }
        print("Hello \(name)!")
        guard let location = person["location"] else {
                print("I hope the weather is nice near you.")
                return
        }
        print("I hope the weather is nice in \(location).")
}
greet(person: ["name": "John"])  // Outputs "Hello John!"  // Outputs "I hope the weather is nice near you."
greet(person: ["name": "Jensen", "location": "Hefei"])
---
output: Hello John!
I hope the weather is nice near you.
If the guard condition is met, execution continues after the guard block. Optional binding in a guard condition protects the code after the guard.
If the condition is not met, the code in the else branch is executed. This branch must transfer control to exit the code block where the guard appears. You can use control transfer statements like return, break, continue, or throw, or call a non-returning function like fatalError().
Compared to using if for the same purpose, using guard improves readability. It allows code to execute sequentially without being nested in an else block, and lets you handle invalid cases close to the condition check.
Checking API Availability
Swift has built-in support for checking API availability, ensuring you don’t accidentally use unavailable APIs on the current deployment target.
The compiler uses SDK availability information to verify that all APIs used in your code are available for the specified deployment target. If you try to use an unavailable API, Swift will report a compile-time error.
Use an availability condition in an if or guard statement to conditionally execute code at runtime, checking if an API is available. The compiler uses the information from the availability condition to verify that APIs used in the block are available.
if #available(iOS 10, macOS 10.12, *) {
        // Use iOS 10 APIs on iOS, macOS 10.12 APIs on macOS
} else {
        // Use APIs for earlier versions of iOS and macOS
}
With the above availability condition, the if block runs only on iOS 10 or macOS 10.12 and later. The last parameter * is required, specifying that on all other platforms, if the version is higher than the minimum, the if block will execute.
In general, an availability condition uses a list of platform names and versions. Platform names can be iOS, macOS, watchOS, and tvOS. You can specify major versions like iOS 8 or macOS 10.10, or minor versions like iOS 11.2.6 or macOS 10.13.3.
/*
if #available(platform name version, ..., *) {
         APIs are available, statements will execute
 } else {
         APIs are unavailable, statements will not execute
 }
 */