Swift Learning (4) - Advanced Operators (Code Enhanced Version)


In addition to the basic operators introduced earlier, Swift also provides several advanced operators for performing complex operations on values. These include bitwise and shift operators, which are already familiar to those who have used C and Objective-C.
When defining custom structs, classes, and enums, it can be very useful to provide implementations for standard Swift operators. In Swift, providing custom implementations for these operators is straightforward, and the operators will use the appropriate implementation for each type.
Developers are not limited by predefined operators. In Swift, you can freely define infix, prefix, postfix, and assignment operators, each with custom precedence and associativity. These operators can be used in code just like predefined ones, and you can even extend existing types to support custom operators.
Bitwise Operators
Bitwise operators allow you to manipulate each individual bit within a data structure. They are commonly used in low-level programming, such as graphics programming and creating device drivers. Bitwise operators are also useful when dealing with raw data from external resources, such as encoding and decoding data transmitted via custom communication protocols.
Swift supports all the bitwise operators from the C language, which will be introduced one by one below.
Bitwise NOT Operator
The bitwise NOT operator ~ inverts all the bits in a value.
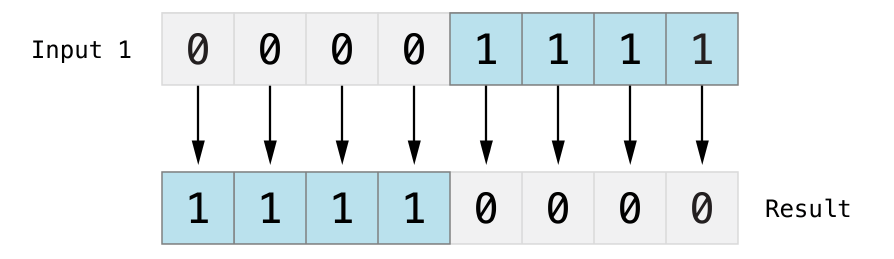
The bitwise NOT operator is a prefix operator, placed directly before the operand, with no space between the operator and the operand.
let initialBits: UInt8 = 0b00001111
let invertedBits = ~initialBits  // Equals 0b11110000
print("The result of bitwise NOT on \(initialBits) is: \(invertedBits)")
---
output: The result of bitwise NOT on 15 is: 240
A UInt8 integer has 8 bits and can store any integer between 0 and 255. This example initializes a UInt8 integer with the binary value 00001111, where the first 4 bits are 0 and the last 4 bits are 1. This is equivalent to the decimal value 15.
The bitwise NOT operator is then used to create a constant named invertedBits, whose value is the bitwise inversion of initialBits. All 0s become 1s and all 1s become 0s. The binary value of invertedBits is 11110000, which equals the unsigned decimal value 240.
Bitwise AND Operator
The bitwise AND operator & combines the bits of two numbers. It returns a new number whose bits are 1 only if the corresponding bits of both numbers are 1.

In the example below, the middle 4 bits of both firstSixBits and lastSixBits are 1. Using the bitwise AND operator results in the binary value 00111100, which equals the unsigned decimal value 60.
let firstSixBits: UInt8 = 0b11111100
let lastSixBits: UInt8 = 0b00111111
let middleFourBits = firstSixBits & lastSixBits  // Equals 0b00111100
print("The result of bitwise AND on \(firstSixBits) and \(lastSixBits) is: \(middleFourBits)")
---
output: The result of bitwise AND on 252 and 63 is: 60
Bitwise OR Operator
The bitwise OR operator | compares the bits of two numbers. It returns a new number whose bits are 1 if either of the corresponding bits is 1.
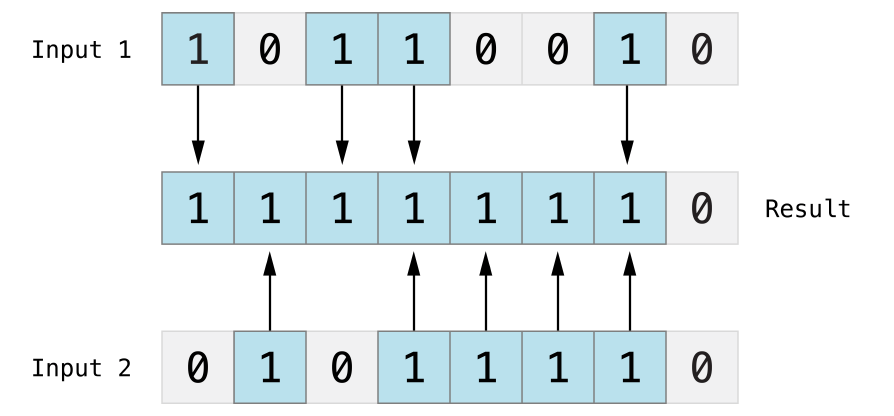
In the example below, someBits and moreBits have different bits set to 1. Using the bitwise OR operator results in the binary value 11111110, which equals the unsigned decimal value 254.
let someBits: UInt8 = 0b10110010
let moreBits: UInt8 = 0b01011110
let combinedBits = someBits | moreBits
print("The result of bitwise OR on \(someBits) and \(moreBits) is: \(combinedBits)")
---
output: The result of bitwise OR on 178 and 94 is: 254
Bitwise XOR Operator
The bitwise XOR operator ^, also known as the “exclusive or” operator, compares the bits of two numbers. It returns a new number whose bits are 1 if the corresponding bits are different, and 0 if they are the same.
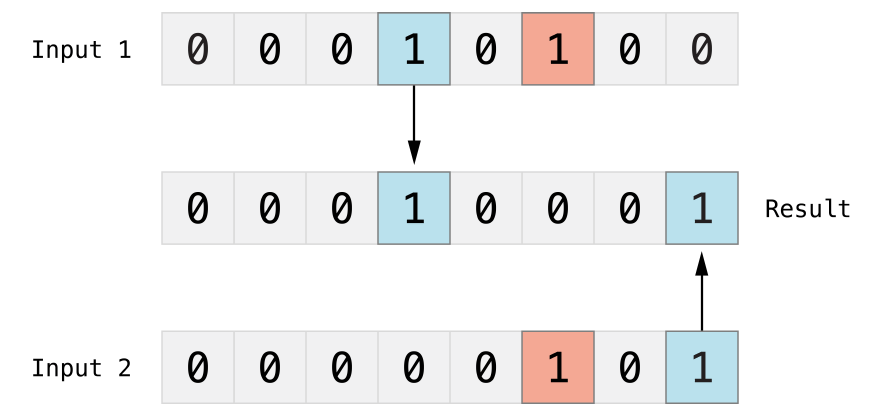
In the example below, both firstBits and otherBits have bits that are 1 in one and 0 in the other. The bitwise XOR operator sets these bits to 1 in the result. For the remaining bits, where firstBits and otherBits are the same, the result is 0.
let firstBits: UInt8 = 0b00010100
let otherBits: UInt8 = 0b00000101
let outputBits = firstBits ^ otherBits
print("The result of bitwise XOR on \(firstBits) and \(otherBits) is: \(outputBits)")
---
output: The result of bitwise XOR on 20 and 5 is: 17
Bitwise Left and Right Shift Operators
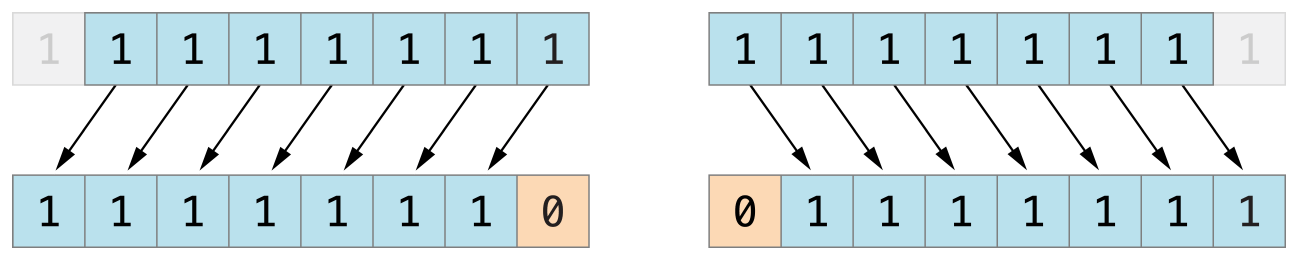
The bitwise left shift operator << and the bitwise right shift operator >> shift all the bits in a number to the left or right by a specified number of positions, following the rules defined below.
Shifting a number left or right by one position is equivalent to multiplying or dividing the number by 2. Shifting an integer left by one position is the same as multiplying it by 2; shifting right by one position is the same as dividing it by 2.
Shifting Unsigned Integers
The rules for shifting unsigned integers are as follows:
1. Existing bits are shifted left or right by the specified number of positions.
2. Any bits that move beyond the storage range of the integer are discarded.
3. Empty positions created by the shift are filled with 0.
This method is known as logical shift.
The following code demonstrates shift operations in Swift.
let shiftBits: UInt8 = 0b00000100
print("\(shiftBits) shifted left by 1: \(shiftBits << 1)")  // 0b00001000
print("\(shiftBits) shifted left by 2: \(shiftBits << 2)")  // 0b00010000
print("\(shiftBits) shifted left by 5: \(shiftBits << 5)")  // 0b10000000
print("\(shiftBits) shifted left by 6: \(shiftBits << 6)")  // 0b00000000
print("\(shiftBits) shifted right by 2: \(shiftBits >> 2)")  // 0b00000001
---
output: 4 shifted left by 1: 8
4 shifted left by 2: 16
4 shifted left by 5: 128
4 shifted left by 6: 0
4 shifted right by 2: 1
You can use shift operations to encode and decode other data types.
let pink: UInt32 = 0xCC6699; print(pink)
let redComponent  = (pink & 0xFF0000) >> 16  // redComponent is 0xCC, i.e., 204
let greenComponent = (pink & 0x00FF00) >> 8  // greenComponent is 0x66, i.e., 102
let blueComponent = (pink & 0x0000FF) // blueComponent is 0x99, i.e., 153
print("Red component in pink: \(redComponent)")
print("Green component in pink: \(greenComponent)")
print("Blue component in pink: \(blueComponent)")
---
output: 13395609
Red component in pink: 204
Green component in pink: 102
Blue component in pink: 153
In the example above, a constant named pink of type UInt32 stores the color value for pink in Cascading Style Sheets (CSS). The CSS color value #CC6699 is represented in Swift as the hexadecimal 0xCC6699. The bitwise AND operator & and the right shift operator >> are then used to extract the red (CC), green (66), and blue (99) components from this color.
The red component (redComponent) is obtained by performing a bitwise AND between 0xCC6699 and 0xFF0000, which masks out the second and third bytes, leaving 0xCC0000. Shifting this number right by 16 bits results in 0x0000CC, which is the decimal value 204.
Shifting Signed Integers
Compared to unsigned integers, shifting signed integers is more complex due to their binary representation. (For simplicity, the following examples use 8-bit signed integers, but the principles apply to signed integers of any size.)
Signed integers use the first bit (usually called the sign bit) to indicate whether the number is positive or negative. A sign bit of 0 means positive, and 1 means negative.
The remaining bits (value bits) store the actual value. The storage of positive signed integers is the same as unsigned integers, starting from 0. Here is the binary representation of the value 4 as an Int8:
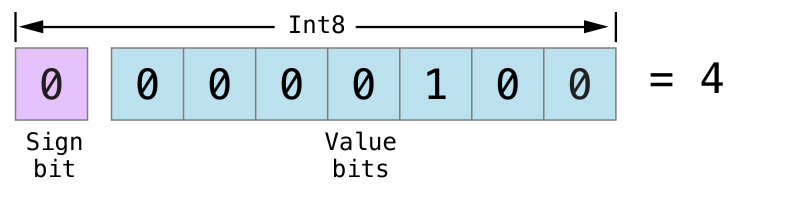
The sign bit is 0 (indicating a positive number), and the other 7 bits represent the binary value of decimal 4.
Negative numbers are stored differently: they store 2 to the power of n minus the absolute value, where n is the number of value bits. An 8-bit number has 7 value bits, so 2^7 = 128. Here is the binary representation of -4 as an Int8:
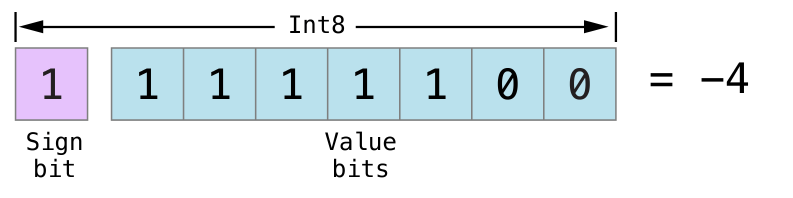
This time, the sign bit is 1, indicating a negative number, and the other 7 bits represent the value 124 (i.e., 2^7 - |-4| = 124).
This representation of negative numbers is called two’s complement. While it may seem odd at first, it has several advantages.
First, if you want to add -1 and -4, you simply add all 8 bits (including the sign bit) as standard binary addition, discarding any overflow beyond 8 bits.
Second, using two’s complement allows left and right shifts on negative numbers to behave the same as on positive numbers: each left shift multiplies by 2, and each right shift divides by 2. To achieve this, right shifts on signed integers have an extra rule: when right shifting a signed integer, the empty positions are filled with the sign bit, not 0.
This behavior ensures that the sign bit of a signed integer does not change due to a right shift, which is commonly called arithmetic shift.
Overflow Operators
When you assign a value to an integer constant or variable that exceeds its capacity, Swift will throw an error by default, rather than allowing an invalid number to be created. This behavior provides extra safety when working with numbers that are too large or too small.
For example, the range of values for a signed Int16 is -32768 to 32767. Assigning a value outside this range to an Int16 variable or constant will cause an error.
var potentialOverFlow = Int16.max
//potentialOverFlow += 1  // Uncommenting this line will cause an error: Swift runtime failure: arithmetic overflow
Handling errors when assigning out-of-range values allows developers to be more flexible when dealing with boundary values.
However, when desired, developers can choose to have the system perform truncation instead of throwing an error when an overflow occurs. Swift provides three overflow operators to support integer overflow operations. These operators all start with &:
- Overflow addition
&+ - Overflow subtraction
&- - Overflow multiplication
&*
Numeric Overflow
Overflow can occur as either an overflow (too large) or underflow (too small).
The following example demonstrates what happens when you use overflow addition on an unsigned integer.
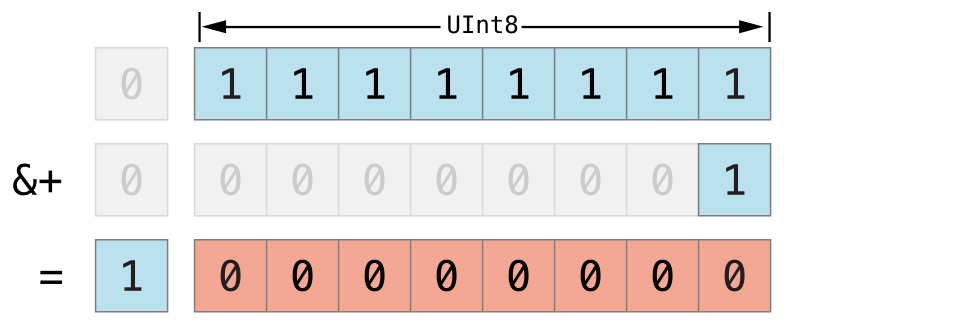
var unsignedOverFlow = UInt8.max  // unsignedOverFlow is the maximum value UInt8 can hold, 255
unsignedOverFlow = unsignedOverFlow &+ 1  // unsignedOverFlow is now 0
print("Value of UInt8 after overflow: \(unsignedOverFlow)")
---
output: Value of UInt8 after overflow: 0
unsignedOverFlow is initialized to the maximum value for UInt8 (255, or 11111111 in binary), then the overflow addition operator &+ is used to add 1. This causes the binary representation to exceed the number of bits UInt8 can hold, resulting in overflow. The value wraps around to 00000000, which is 0 in decimal.
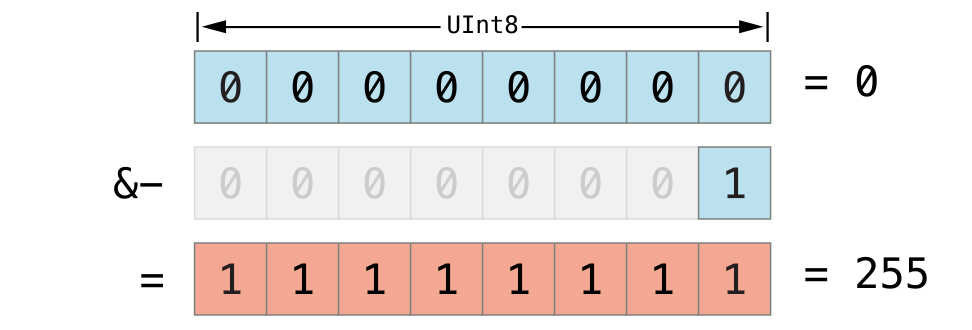
Allowing underflow on an unsigned integer produces a similar result. Here is an example using the overflow subtraction operator &-:
unsignedOverFlow = UInt8.min  // unsignedOverFlow is the minimum value UInt8 can hold, 0
unsignedOverFlow = unsignedOverFlow &- 1  // unsignedOverFlow is now 255
print("Value of UInt8 after underflow: \(unsignedOverFlow)")
---
output: Value of UInt8 after underflow: 255
The minimum value for a UInt8 integer is 0 (00000000 in binary). Using the overflow subtraction operator to subtract 1 causes underflow, wrapping the value to 11111111, which is 255 in decimal.
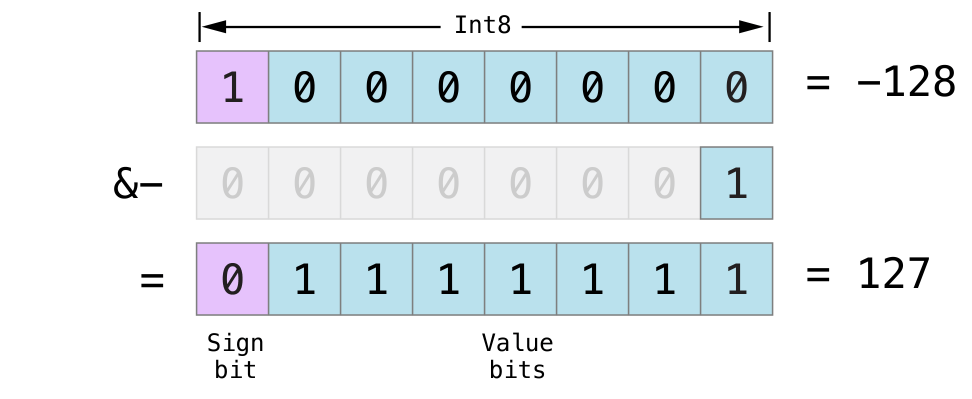
Overflow can also occur with signed integers. For signed integers, all overflow addition and subtraction operations are performed as bitwise operations, including the sign bit, as described for left and right shift operators.
var signedOverFlow = Int8.min  // signedOverFlow is the minimum value Int8 can hold, -128
signedOverFlow = signedOverFlow &- 1  // signedOverFlow is now 127
print("Value of Int8 after underflow: \(signedOverFlow)")
---
output: Value of Int8 after underflow: 127
The minimum value for an Int8 integer is -128 (10000000 in binary). Using the overflow subtraction operator to subtract 1 flips the sign bit, resulting in 01111111, which is 127 in decimal—the maximum value for Int8.
For both unsigned and signed integers, when an overflow occurs, the value wraps from the maximum to the minimum value. Similarly, underflow wraps from the minimum to the maximum value.
Precedence and Associativity
Operator precedence determines which operators are evaluated before others, meaning higher-precedence operators are evaluated first.
Associativity defines how operators of the same precedence are grouped—whether they group with the left or right operand.
When considering the evaluation order of a complex expression, operator precedence and associativity are very important. For example, operator precedence explains why the following expression evaluates to 17:
var result = 2 + 3 % 4 * 5  // result is 17
print("The value of 2 + 3 % 4 * 5 is: \(result)")
---
output: The value of 2 + 3 % 4 * 5 is: 17
If you evaluate from left to right, you might think the calculation goes like this:
- 2 + 3 = 5
- 5 % 4 = 1
- 1 * 5 = 5
But the correct answer is 17, not 5. Higher-precedence operators are evaluated before lower-precedence ones. As in C, in Swift, the multiplication * and modulo % operators have higher precedence than addition +. Therefore, they are evaluated before addition.
Multiplication and modulo have the same precedence, so associativity determines the order. Both are left-associative, so you can think of implicit parentheses grouping from the left. That is, 2 + 3 % 4 * 5 ==> 2 + ((3 % 4) * 5) ==> 2 + (3 * 5) ==> 2 + 15 ==> 17. Thus, the result is 17.
Operator Functions
Classes and structs can provide custom implementations for existing operators, a process known as operator overloading.
The following example shows how to make a custom struct support the addition operator +. The arithmetic addition operator is a binary operator, meaning it operates on two values, and is also called an infix operator because it appears between two values.
The example defines a struct called Vector2D to represent a two-dimensional vector (x, y), and then defines an operator function to add two Vector2D instances.
struct Vector2D {
        var x = 0.0, y = 0.0
}
extension Vector2D {
        static func + (left: Vector2D, right: Vector2D) -> Vector2D {
                return Vector2D(x: left.x + right.x, y: left.y + right.y)
        }
}
This operator function is defined as a static method on Vector2D, and its name matches the operator being overloaded (+). Since addition is not a required feature for a vector, the method is defined in an extension rather than in the struct declaration. As a binary operator, the function takes two Vector2D parameters and returns a Vector2D.
In this implementation, the parameters are named left and right, representing the two Vector2D instances on the left and right of the + operator. The resulting instance’s x and y are the sums of the corresponding values from the two parameters.
This method can be used as an infix operator between any two Vector2D instances.
let vector = Vector2D(x: 3.0, y: 1.0)
let anotherVector = Vector2D(x: 2.0, y: 4.0)
let combinedVector = vector + anotherVector  // combinedVector is a new Vector2D with value (5.0, 5.0)
print("The result of adding two Vector2D vectors is: \(combinedVector)")
---
output: The result of adding two Vector2D vectors is: Vector2D(x: 5.0, y: 5.0)
Prefix and Postfix Operators
The previous example showed a custom implementation of a binary infix operator. Classes and structs can also provide implementations for standard unary operators. A unary operator operates on a single value. When the operator appears before the value, it is a prefix operator (e.g., -a); when it appears after, it is a postfix operator (e.g., b!).
To implement a prefix or postfix operator, specify the prefix or postfix modifier before the func keyword when declaring the operator function.
extension Vector2D {
        static prefix func - (vector: Vector2D) -> Vector2D {
                return Vector2D(x: -vector.x, y: -vector.y)
        }
}
The code above implements a unary operator (-a) for Vector2D. Since it is a prefix operator, the function uses the prefix modifier.
For simple values, the unary minus operator changes the sign. For Vector2D, this operation negates both the x and y properties.
let positive = Vector2D(x: 3.0, y: 4.0)
let negative = -positive  // negative is Vector2D(-3.0, -4.0)
let alsoPositive = -negative  // alsoPositive is Vector2D(3.0, 4.0)
print("The value of -positive is: \(negative)")
print("The value of -negative is: \(alsoPositive)")
---
output: The value of -positive is: Vector2D(x: -3.0, y: -4.0)
The value of -negative is: Vector2D(x: 3.0, y: 4.0)
Compound Assignment Operators
Compound assignment operators combine the assignment operator = with another operator. For example, addition and assignment combine to form the addition assignment operator +=. When implementing, the left parameter must be of inout type, since its value will be modified directly within the operator function.
The following example implements an addition assignment operator for Vector2D instances.
extension Vector2D {
        static func += (left: inout Vector2D, right: Vector2D) {
                left = left + right  // Uses the previously defined addition operator
        }
}

var original = Vector2D(x: 1.0, y: 2.0)
let vectorToAdd = Vector2D(x: 3.0, y: 4.0)
original += vectorToAdd  // original is now (4.0, 6.0)
print("The value after compound addition assignment for Vector2D is: \(original)")
---
output: The value after compound addition assignment for Vector2D is: Vector2D(x: 4.0, y: 6.0)
Note
You cannot overload the default assignment operator
=. Only compound assignment operators can be overloaded. Similarly, the ternary conditional operator (a ? b : c) cannot be overloaded.
Equivalence Operators
By default, custom classes and structs do not implement equivalence operators, usually called the equality operator == and the inequality operator !=.
To use equivalence operators for custom types, you need to provide a custom implementation for the equality operator and conform to the standard library’s Equatable protocol.
extension Vector2D: Equatable {  // Conforming to Equatable allows implementation of == and !=
        static func == (left: Vector2D, right: Vector2D) -> Bool {
                return (left.x == right.x) && (left.y == right.y)
        }
}
The code above implements the equality operator (==) to determine if two Vector2D instances are equal. For Vector2D, equality means both x and y are equal, which is the logic used in the code. If you implement the equality operator, you usually do not need to implement the inequality operator (!=). The standard library provides a default implementation for != that simply returns the negation of the equality operator’s result.
let twoThree = Vector2D(x: 2.0, y: 3.0)
let anotherTwoThree = Vector2D(x: 2.0, y: 3.0)
if twoThree == anotherTwoThree {
        print("These two vectors are equivalent!")
}
let threeTwo = Vector2D(x: 3.0, y: 2.0)
if twoThree != threeTwo {  // No need to implement != if == is implemented
        print("These two vectors are not equivalent!")
}
---
output: These two vectors are equivalent!
These two vectors are not equivalent!
In most simple cases, you can let Swift synthesize the implementation of equivalence operators (by conforming to the Equatable protocol, etc.).
Custom Operators
In addition to implementing standard operators, you can also declare and implement custom operators in Swift.
New operators are defined in the global scope using the operator keyword, and you must specify the prefix, infix, or postfix modifier.
prefix operator +++ // Defines a new prefix operator named `+++`The code above defines a new prefix operator named +++. This operator has no predefined meaning in Swift, so you can give it a custom meaning in the context of Vector2D instances. In this example, +++ is implemented as a “prefix self-doubling” operator. It uses the previously defined compound addition operator to add the vector to itself, doubling both the x and y properties. You can implement this by adding a +++ static method to Vector2D:
extension Vector2D {
        static prefix func +++ (vector: inout Vector2D) -> Vector2D {
                vector += vector
                return vector
        }
}

var toBeDoubled = Vector2D(x: 1.0, y: 4.0)
let afterDoubling = +++toBeDoubled  // Both toBeDoubled and afterDoubling are now (2.0, 8.0)
print("Value of toBeDoubled: \(toBeDoubled)")
print("Value of afterDoubling: \(afterDoubling)")
---
output: Value of toBeDoubled: Vector2D(x: 2.0, y: 8.0)
Value of afterDoubling: Vector2D(x: 2.0, y: 8.0)
Precedence of Custom Infix Operators
Every custom infix operator belongs to a precedence group. The precedence group specifies the operator’s precedence and associativity relative to other infix operators.
If a custom infix operator is not explicitly assigned to a precedence group, it is placed in a default group with higher precedence than the ternary operator.
The following example defines a new custom infix operator +-, which belongs to the AdditionPrecedence group.
infix operator +-: AdditionPrecedence
extension Vector2D {
        static func +- (left: Vector2D, right: Vector2D) -> Vector2D {
                return Vector2D(x: left.x + right.x, y: left.y - right.y)
        }
}
let firstVector = Vector2D(x: 1.0, y: 2.0)
let secondVector = Vector2D(x: 3.0, y: 4.0)
let plusMinusVector = firstVector +- secondVector  // plusMinusVector is Vector2D(4.0, -2.0)
print("Value of plusMinusVector: \(plusMinusVector)")
---
output: Value of plusMinusVector: Vector2D(x: 4.0, y: -2.0)
This operator adds the x values of two vectors and subtracts the y value of the second vector from the first. Since it is essentially an “addition-type” operator, it is placed in the same precedence group as the default infix addition operators (+, -), i.e., AdditionPrecedence.
Note
When defining prefix and postfix operators, precedence is not specified. However, if both a prefix and postfix operator are used on a value, the postfix operator is evaluated first.
Result Builders
A result builder is a custom type that supports adding natural, declarative syntax for creating nested data such as lists or trees. With result builders, code can include regular Swift syntax, such as if for conditional logic or for for handling repeated data.
The following code defines some types for drawing star segments and text segments.
protocol Drawable {
        func draw() -> String
}
struct Line: Drawable {
        var elements: [Drawable]
        func draw() -> String {
                return elements.map { $0.draw() }.joined(separator: "")  // When drawing a Line, call draw() on each element and join the results into a single string
        }
}
struct Text: Drawable {
        var content: String
        init(_ content: String) { self.content = content }
        func draw() -> String {
                return content
        }
}
struct Space: Drawable {
        func draw() -> String {
                return " "
        }
}
struct Stars: Drawable {
        var length: Int
        func draw() -> String {
                return String(repeating: "*", count: length)
        }
}
struct AllCaps: Drawable {
        var content: Drawable
        func draw() -> String {
                return content.draw().uppercased()
        }
}
The Drawable protocol specifies the required method for drawing, such as lines or shapes, which must implement draw(). The Line struct represents a single line segment and provides a top-level container for most drawable elements. When drawing a Line, it calls draw() on each element and joins the results into a single string. The Text struct wraps a string as part of the drawing. The AllCaps struct wraps another drawable element and converts all text to uppercase.
You can combine these constructors to create a drawable element.
let name: String? = "Jensen Jon"
let manualDrawing = Line(elements: [Stars(length: 3), Text("Hello"), Space(), AllCaps(content: Text((name ?? "World") + "!")), Stars(length: 2)])
print(manualDrawing.draw())  // Prints "***Hello JENSEN JON!**"
---
output: ***Hello JENSEN JON!**
The code works, but it’s not elegant. The parentheses after AllCaps are deeply nested, making it hard to read. The fallback logic for name being nil relies on the ?? operator, which becomes harder to read as logic grows more complex. If you need a switch or for loop to build part of the drawing, it becomes even harder to write. Using a result builder can refactor such code to look more like regular Swift code.
Add the @resultBuilder attribute to a type definition to define a result builder. For example, the following code defines a result builder DrawingBuilder that allows declarative syntax for drawing.
@resultBuilder
struct DrawingBuilder {
        static func buildBlock(_ components: Drawable...) -> Drawable {
                return Line(elements: components)
        }
        static func buildEither(first component: Drawable) -> Drawable {
                return component
        }
        static func buildEither(second component: Drawable) -> Drawable {
                return component
        }
}
The DrawingBuilder struct defines three methods to implement parts of the result builder syntax.
The buildBlock(_:) method adds support for writing multiple lines of code in the block. It combines multiple elements in the block into a Line. The buildEither(first:) and buildEither(second:) methods add support for if-else statements.
You can apply the @DrawingBuilder attribute to a function parameter, which will convert the closure passed to the function into a value created by the result builder.
func draw(@DrawingBuilder content: () -> Drawable) -> Drawable {
        return content()
}
func caps(@DrawingBuilder content: () -> Drawable) -> Drawable {
        return AllCaps(content: content())
}

func makeGreeting(for name: String? = nil) -> Drawable {
        let greeting = draw {
                Stars(length: 3)
                Text("Hello")
                Space()
                caps {
                        if let name = name {
                                Text(name + "!")
                        } else {
                                Text("World!")
                        }
                }
                Stars(length: 2)
        }
        return greeting
}

let genericGreeting = makeGreeting()
print(genericGreeting.draw())  // Prints "***Hello WORLD!**"

let personalGreeting = makeGreeting(for: "Jensen Jon")
print(personalGreeting.draw())  // Prints "***Hello JENSEN JON!**"
---
output: ***Hello WORLD!**
***Hello JENSEN JON!**
The makeGreeting(for:) function uses the name parameter to draw a personalized greeting.
The draw(_:) and caps(_:) functions both take a single closure parameter with the @DrawingBuilder attribute. When calling these functions, you use the special syntax defined by DrawingBuilder. Swift converts the declarative drawing description into a series of DrawingBuilder method calls, constructing the final value passed to the function. For example, Swift converts the call to caps(_:) in the example into the following code:
let capsDrawing = caps {
        let partialDrawing: Drawable
        if let name = name {
                let text = Text(name + "!")
                partialDrawing = DrawingBuilder.buildEither(first: text)
        } else {
                let text = Text("World!")
                partialDrawing = DrawingBuilder.buildEither(second: text)
        }
        return partialDrawing
}
Swift converts the if-else block into calls to buildEither(first:) and buildEither(second:). While you won’t call these methods directly, seeing the transformed result helps clarify how Swift uses DrawingBuilder syntax.
To support for loops for certain drawing syntax, you need to add the buildArray(_:) method.
extension DrawingBuilder {
        static func buildArray(_ components: [Drawable]) -> Drawable {
                return Line(elements: components)
        }
}
func makeStars() -> Drawable {
        let manyStars = draw {
                Text("Stars:")
                for length in 1...3 {
                        Space()
                        Stars(length: length)  // buildArray(_:) is called automatically for the for loop
                }
        }
        return manyStars
}
let generateStars = makeStars()
print(generateStars.draw())
---
output: Stars: * ** ***
In the code above, a for loop is used to create an array of drawings, and the buildArray(_:) method constructs the array into a Line.